A good front door paint job needs the right prep, the right paint type, and thin, even coats applied in the correct order. Most doors need two to three coats and a full day to cure before you close them or reattach hardware.
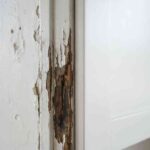
Your front door takes more abuse than almost any other painted surface in your home. It gets direct sun, rain, dust, and constant hands on the same spot near the knob. Pick the wrong paint or skip a prep step, and you’ll see peeling or dulling within a season instead of years.
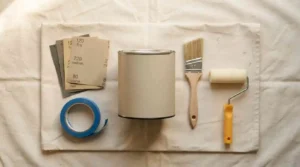
What you’ll need before you start
- 120-grit and 220-grit sandpaper
- A mild degreaser or soap and water
- Painter’s tape and plastic sheeting or a drop cloth
- An angled sash brush for edges and panels
- A foam or 1/4-inch nap roller for flat sections
- Exterior-grade primer (if your door needs it)
- Exterior acrylic latex or oil-based paint in your chosen sheen
- A paint conditioner such as Floetrol, if you’re using latex
Prep the door so the paint actually sticks
Skipping prep is the single biggest reason a front door paint job fails early. Painters agree on the same three steps in a different order depending on the source, but the goal is always the same: a clean, slightly rough, dust-free surface.
Sand first
Start with 120-grit sandpaper to knock down old gloss, chips, or uneven old paint. Switch to 220-grit for a finer pass once the surface is level. If the door is bare wood or metal, a lighter single pass with 220-grit is usually enough since there’s no old finish to remove.
Clean and dry completely
Wash the door with a mild degreaser, paying extra attention to the area around the handle and the bottom edge, where hand oils and splashback build up. Let it dry fully. Any trapped moisture under new paint can cause bubbling or peeling later.
Tape and protect
Cover glass panes, hinges, and any hardware you’re leaving in place with painter’s tape. If you have glass inserts, a liquid masking product works well because you can peel it off cleanly with a blade once the paint dries. Lay a drop cloth to catch drips.
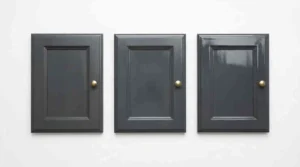
Choosing the right paint type and sheen
Exterior acrylic latex paint has become the more common choice for front doors because it resists yellowing, cleans up with water, and holds color well under UV exposure. Oil-based paint still has a reputation for a harder, more chip-resistant finish, and some painters prefer it for high-traffic wood doors, but it takes longer to dry and needs mineral spirits for cleanup.
Sheen matters as much as the paint type. Satin gives a smooth look that hides small surface flaws. Semi-gloss is more durable and easier to wipe clean, which is why many painters recommend it for doors that get touched constantly. High-gloss looks striking but shows every brush mark and surface imperfection, so it only pays off if your prep work is close to perfect.
Do you need primer?
Primer isn’t always required, but skip it at your own risk in these situations: you’re going from a dark color to a lighter one, you’re covering bare wood or metal, the door has stains or old knots showing through, or you’re switching from an old oil-based paint to a new latex paint. A quality exterior primer blocks the old color and gives the new paint an even base to grip.
Apply primer with an angled brush in the recessed panels and corners, then roll the flat sections with a 1/4-inch nap roller. One thin coat is usually enough. Let it cure fully, ideally the full drying window listed on the can, before you start painting.
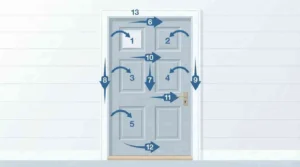
How to paint a front door in the right order
The order you paint in prevents the lap marks and roller lines that give away a rushed job. Work while each section is still slightly wet so the next section blends into it.
- Brush the recessed panel edges and corners with an angled brush.
- Roll the flat panel centers with a foam or nap roller.
- Roll the horizontal rails, top, middle, and bottom.
- Roll the center vertical stile from top to bottom.
- Finish with the outer vertical stiles on both sides.
Don’t forget the door’s edges. If your interior and exterior colors differ, paint the hinge-side edge to match the outside color, since that’s what shows when the door swings open, and paint the latch-side edge to match the inside color.
Apply paint in thin coats. Most front doors need two to three coats depending on how dramatic the color change is and how much the old finish shows through. Thick coats look tempting because they cover faster, but they’re also what causes drips, uneven sheen, and a soft, easily dented finish.
Drying time and when to close the door again
Dry time between coats usually runs four to six hours, though heat and humidity change that window. After the final coat, wait at least 24 hours before closing the door fully or reinstalling hardware like the knob or deadbolt. Closing it too early can stick the paint to the frame and pull it right back off.
Weather and timing for exterior door paint
Painting in direct sun causes the paint to skin over before it has time to level out, which leaves brush marks and an uneven sheen behind. Mild, dry conditions with moderate temperatures give the best results, and painters generally recommend working in the 65 to 75 degree Fahrenheit range where the label allows it. In regions with hot summers, heavy dust, or a monsoon season, plan the job for a stretch of dry, overcast days rather than the peak of summer heat, and give the paint extra dry time if humidity is high.
Choosing a front door color
Color choice is largely about contrast and durability rather than any single “correct” shade. Navy blue and charcoal grey read as classic and hide dust well, which makes them practical for busy streets. Black is the most versatile option and pairs with almost any exterior wall color. Warm wood tones like walnut or mahogany suit traditional wooden doors and homes with earth-toned exteriors. A deep red or burgundy adds warmth against neutral or beige walls, while soft greens and teals work well against greenery or a more relaxed, natural exterior. Whichever color you choose, a semi-gloss or satin finish in a UV-stable exterior formula will hold its depth longer than a flat finish exposed to direct sun.
Common mistakes to avoid
Painting in direct sunlight, skipping sanding on a glossy old finish, applying paint too thick, closing the door before it’s cured, and using a roller nap thicker than 1/4 inch all show up as visible flaws later. Each one is easy to avoid once you know to watch for it, and none of them require expensive tools to fix.
Front door paint is one of the fastest, cheapest upgrades a home exterior can get. Prep the surface properly, choose a paint and sheen built for exterior wear, and follow a consistent painting order, and the finish will hold its look for years rather than months.
FAQ’s Frequently asked questions about front door paint
1:How many coats of paint does a front door need?
Most front doors need two to three thin coats. The exact number depends on the paint’s coverage, the color change you’re making, and whether you primed first.
2:Do I need to remove the door before painting it?
No. You can paint a front door on its hinges as long as you keep it open while it dries. Removing it makes it easier to work flat and avoid drips, but it isn’t required.
3:What’s the best paint sheen for a front door?
Satin and semi-gloss are the most common choices. Satin hides small imperfections better, while semi-gloss is more durable and easier to wipe clean in high-traffic spots.
4:How long should I wait before closing my front door after painting?
Wait at least 24 hours before closing it fully or reinstalling hardware. Closing it too soon can stick the paint to the frame.
5:Can I paint a front door in hot or dusty weather?
It’s best to avoid direct sun and very hot conditions, since heat makes the paint dry too fast and can trap dust in the finish. Pick a mild, dry, overcast stretch of days instead.
6:Do metal and wood doors need different paint?
Wood and fiberglass doors generally do well with an acrylic latex exterior paint, while metal doors benefit from a direct-to-metal paint or a metal-specific primer to prevent rust.